Installing Sills: Why You Need Them and How to Choose
Sills are one of the most important, but often underestimated elements of window construction. They protect the building facade from moisture and play a key role in preserving the integrity of the wall under the window. In this article, we’ll tell you why you need sills, what materials are better to choose, and how to install them correctly. In Kyiv, where climate conditions (increased humidity, frequent rains) require reliable facade protection, proper sill selection and installation is especially relevant.
What Are Sills and Why You Need Them
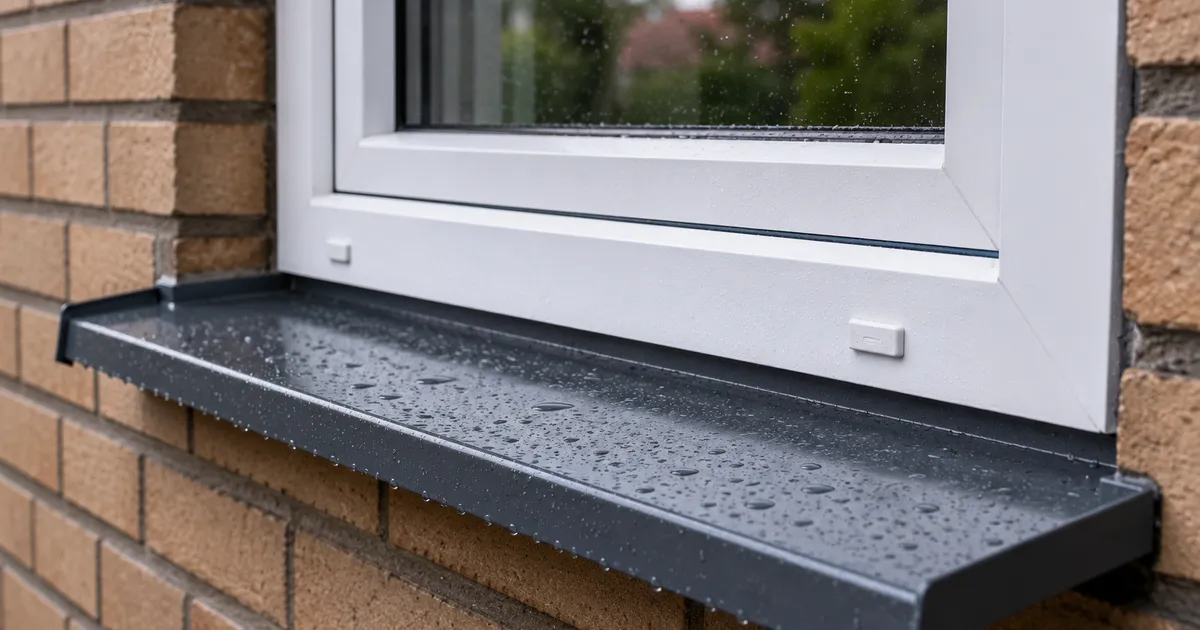
Sills (exterior windowsills) are protective elements installed outside under the window opening. Their main function is to divert rain and melt water away from the building wall.
Main Sill Functions
- Moisture protection. Prevent water from penetrating the wall structure, which is especially important for buildings with increased humidity.
- Stain prevention. Without sills, water runs down the wall, leaving dirty traces and stains.
- Mold protection. Constant humidity leads to mold and fungus formation, which destroy plaster and harm residents’ health.
- Aesthetic function. Complete the window’s exterior appearance, making it neat and finished.
- Sound insulation. Additionally protect from street noise.
Expert Tip: Sills are especially important for buildings with soft facades (plaster, siding), as these materials are most sensitive to moisture.
When Sills Are Needed
Sills are mandatory in the following cases:
- When installing new windows
- When repairing or replacing old sills
- If stains or mold appear on the wall under the window
- During building facade reconstruction
- For new buildings at the finishing stage
Types of Sills by Material
Today’s market offers several types of sills, each with its own characteristics.
Galvanized Steel with Polymer Coating
The most popular and most affordable option. Steel is covered with a protective polymer layer that prevents corrosion and gives the product an attractive appearance.
Advantages:
- Low price
- High strength
- Wide color selection
- Simple installation
Disadvantages:
- May rust when coating is damaged
- Heavier than aluminum options
Aluminum Sills
Lightweight and corrosion-resistant sills that are perfectly suited for buildings with increased humidity or in coastal areas.
Advantages:
- Lightweight
- Corrosion resistance
- Durability
- No painting required
Disadvantages:
- Higher price
- Lower bending strength
Plastic Sills
Used less frequently, mainly for budget options. Lightweight, but less strong than metal counterparts.
Advantages:
- Low price
- Lightweight
- Don’t rust
Disadvantages:
- May deform at high temperatures
- Lower strength
- Limited service life
Composite Sills
A modern material that combines the advantages of metal and plastic. Have high strength and resistance to external factors.
How to Choose the Right Size
The right sill size is the key to effective wall protection from moisture.
Width
Standard sill width is 100-200 mm. The choice depends on the window opening depth and wall protrusion.
Rule: The sill should extend 30-50 mm beyond the wall on each side so water runs not along the wall, but to the ground.
Length
Sill length is determined by the window opening width plus 60-100 mm for wings (bends on edges).
Slope
The sill must have a slope from the wall of at least 5-10 degrees for normal water drainage. If the slope is insufficient, water may accumulate and penetrate under the window frame.
Expert Tip: Always consider the wall angle and slope depth. Our UWS specialists will take accurate measurements and select the optimal sill size.
In Kyiv, professional sill installation is especially in demand in multi-story buildings in Obolon, Pechersk, and Sviatoshyn, where old sills often need replacement.
Sill Installation Stages
Sill installation is a process that requires experience and precision. Here are the main stages:
1. Preparation
- Taking window opening measurements
- Selecting sill material and size
- Preparing tools (metal scissors, level, glue or self-tapping screws)
2. Cutting the Blank
The sill is cut considering the wings (bends) on the edges. Wings must be at least 30 mm for reliable corner protection.
3. Installation
- The sill is inserted under the window frame
- Fixed using self-tapping screws or special glue
- Level and slope are checked
4. Sealing
- Filling seams between sill and wall with silicone sealant
- Checking for gaps
5. Final Finishing
- Installing decorative caps
- Checking installation quality
Common Installation Mistakes
- No slope. Leads to water stagnation and leaks.
- Insufficient sealing. Allows water to penetrate under the window frame.
- Incorrect size. A sill that doesn’t extend beyond the wall doesn’t perform its function.
- Using low-quality materials. Leads to quick wear and need for replacement.
Properly installed sills will serve you for over 20 years and reliably protect your building facade from moisture. Contact UWS specialists for professional installation and get warranty on all work. UWS specialists also perform window installation and window hardware repair in Kyiv.